
Bracelet photos are useful for checking the shape, visible joins, edges and finish you would be buying. They cannot give you a complete quality verdict. Follow the bracelet around the image, note the details you can see and ask for any missing angle or specification you need.
Key facts
- A close view can show how parts are arranged at a join, but not what happens inside a metal end fitting or how much force it will withstand.
- An on-wrist photograph does not give your fit measurement, because the model’s wrist and bracelet size may differ from yours.
- A flat front view can conceal a raised center or a bulky fastening, which is why a side profile view is useful.
- If a join looks open, crooked or dark, compare another angle first, since shadow, reflection or overlapping parts can make it hard to read.
A beautiful front view can tell you that you love the design and still hide the underside of the clasp completely. When that happens, ask for an underside view instead of guessing whether the fastening is well made.
Start with the whole bracelet, then follow its connections
Before zooming in, find a photograph that shows the complete bracelet. Trace the band from the fastening around to the other end. Can you follow every strand or link? Is an extension chain, loose tail or decorative part hidden behind the main band? Get a clear picture of the whole design before you compare tiny details.
Next, look at the places where one part meets another: band to clasp, link to connecting ring, bead string to fastening. A close-up shows how those parts sit together and whether you like the way they line up. It can’t show what’s happening inside a metal end fitting or how much force a connection will take.
If a join looks open, crooked or unusually dark, compare another angle first. A shadow, reflection or overlapping component can make the arrangement hard to read. Ask for a clear photograph of that exact area if you still cannot understand how it connects. You do not need to diagnose a defect to decide you want a clearer view.
A worked example: reading a braided bracelet photograph
This photograph comes from Reynborg. The Lisbon Black combines leather and cord. That comes from the product information; you couldn’t tell the materials from the picture alone.
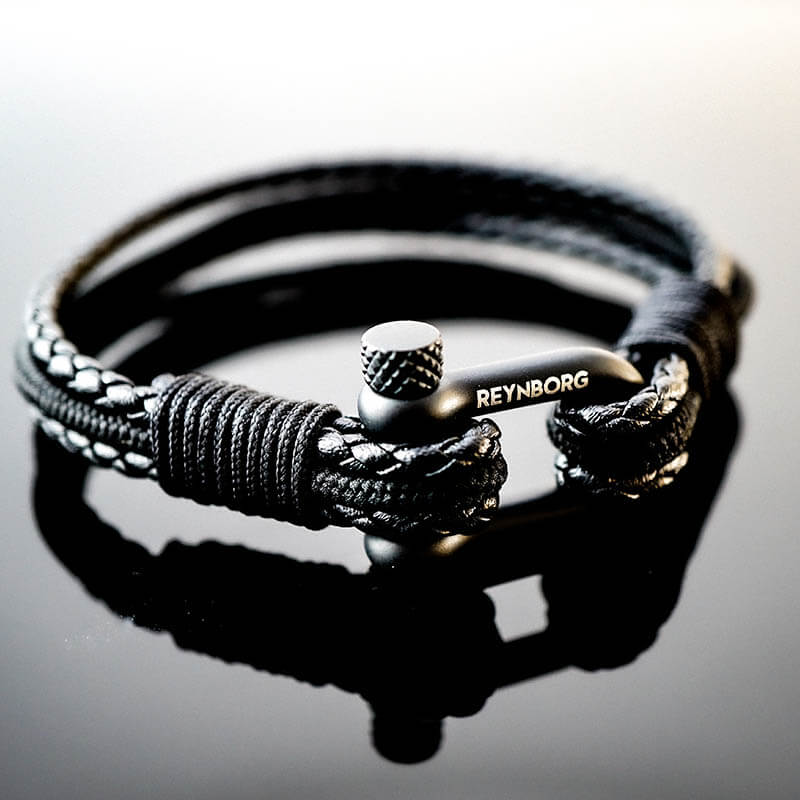
The foreground lets you see several contrasting black textures: broad braided strands, finer cord and a closely wrapped section beside the fastening. The silver-colored fastening has visible lettering and a raised round part. Those details help you decide whether you like the layered appearance and the prominence of the hardware.
Now follow the photograph toward the back. The rear strands are softer in focus, and the reflective surface beneath the bracelet creates a second outline. Follow the bracelet itself, because the reflection isn’t an underside view. The photo shows the front clearly but tells you little about the inside.
If you were comparing this kind of design, the useful next request would be a photograph of the fastening open and a separate underside view. You could then see the parts that meet and where the fastening sits against the wrist. For what the hardware is made of and how the strand ends are secured, you’d need a written answer; the silver color and neat wrapping can’t tell you either.
Do the same with any listing: note what you can see, then ask about what’s hidden.
Look at edges and surfaces from more than one direction
For a cuff or broad metal band, look for a side view that shows the thickness and the shape of the edges. For a strap, look for both long edges and the cut ends. With a chain, look at the sides of the links as well as their polished faces. These views help you judge whether the visible shape and finish suit your preferences.
A bright streak across metal may hide the surface beneath it. A dark edge on a black bracelet can disappear into the background. If you are trying to understand a particular line, patch or edge, a second photograph in softer, more even light is often more useful than enlarging the same image until it becomes blurry.
Keep decorative texture in context. A hammered cuff, a brushed band and a mirror-polished chain are meant to look different. Compare the photo with the finish the seller describes and with other views of the same bracelet before you put a variation down to poor workmanship. And a glossy image can’t tell you how smooth the bracelet will feel on your skin.
For leather designs, our leather bracelet buying guide goes further into the material and how it’s made.
Choose the extra view that answers your question
You rarely need a stack of extra photos. Ask for the one view that answers your question, and ask in writing for anything a photo can’t show.
| What you want to understand | Useful photograph | Still ask in writing |
|---|---|---|
| How the fastening fits together | Clasp open, then closed, with both connecting ends visible | How it opens, closes and is intended to be secured |
| Where the band meets the hardware | Close view from the front and underside | How the band ends are attached inside any covered fitting |
| What touches the wrist | Underside and side profile | Dimensions and any lining or inner-surface material |
| How substantial the design looks | Side profile and on-wrist view | Width, thickness and length for the exact size you are considering |
An on-wrist photograph helps you picture the bracelet with a hand, sleeve or watch. It can’t tell you how it will fit, because the model’s wrist and bracelet size may differ from yours. Use the stated dimensions and your own wrist measurement for that. A flat front view can also conceal a raised center or bulky fastening, which is why the side profile earns its place in a useful gallery.
For help recognizing the visible fastening arrangement, see bracelet clasp types, with pictures. Once you know the type, an opening demonstration or clear operating instructions may answer more than another closed-clasp photograph.
Check the specification behind color and small stamps
Use color to judge the look you want, then read the material description separately. If a bracelet has a silver-colored clasp, ask what the clasp is made from, including any stated coating. If the band uses several materials, ask which material is which part. Don’t assume the band’s material applies to every component.
If a seller points to a hallmark, ask for a readable photo of the whole group of marks. A cropped number on its own tells you very little, and a photo can’t prove a mark is genuine.
Make the decision with the missing information filled in
A useful message is specific: “I like the front view of this bracelet. Could you show the underside of the fastening and confirm its material and thickness?” Name the design and size so the answer is about the version you want.
When the answer arrives, check whether you like the visible construction and have the dimensions, material details and underside views you need. Questions about who made those parts belong in our guide to checking a bracelet’s making process. For the wider purchase, use the bracelet buying guides.
You can like a bracelet’s design without knowing enough to order it yet. A clear extra angle and a precise answer often make the next step much easier.